Most clients will use many of the same custom fields (i.e. Shirt Size, Gender, Dietary Restrictions) across all or many of their registration sites, and this is why we built a custom field library for each client. When you create a custom field, you are able to use the custom field for multiple sites without creating new custom fields each time thus saving time in the building process.
Here are key items to consider when building your site's profile page and using custom fields.
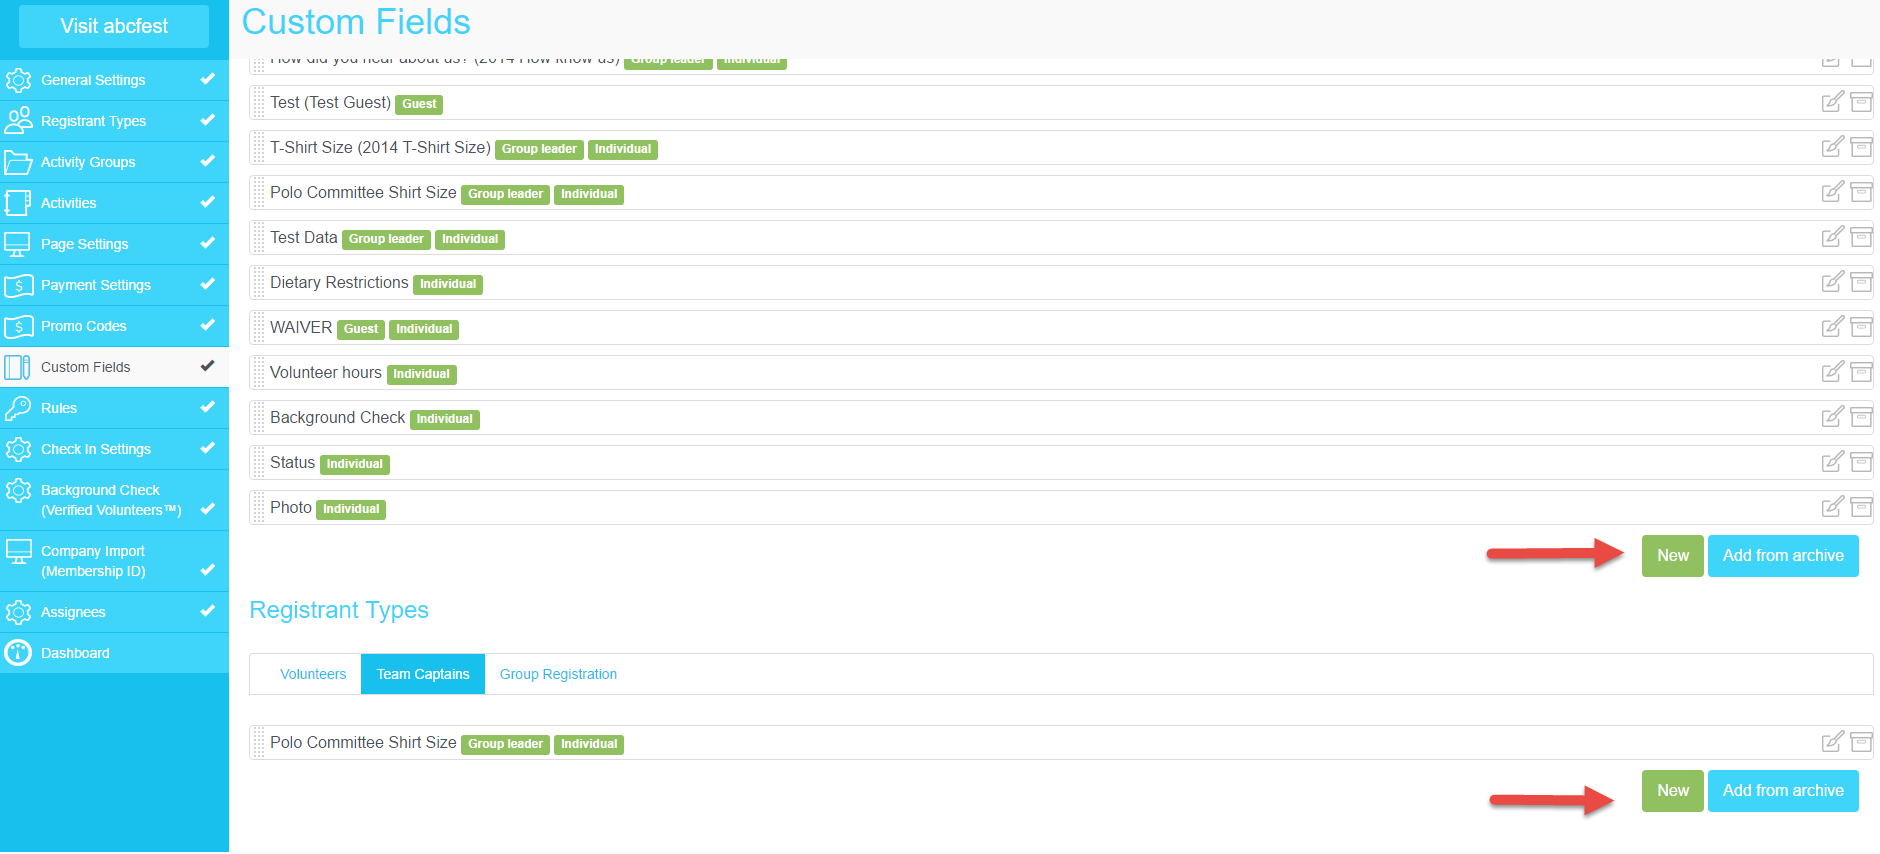
If this is your first time on myTRS - you will need to start with "New Field." While building your first site, you are also building your library of custom fields for future use.
If you already have a site on myTRS - we recommend that you start by clicking "Add from Archive" to look at your library of custom fields.
You can either add fields at the "Site" level in the upper half of the page so the field is available to all registrant types on the site, or if you need to ask specific questions to a particular registrant type, add the fields under the "Registrant Types" section on the lower half of the page. Just click on the specific registrant type to add a field for those registrants.
1. Create A New Field
Click "New Field" if the question you want to ask does not exist already on any of your sites. "New Field" is to build completely new custom fields.
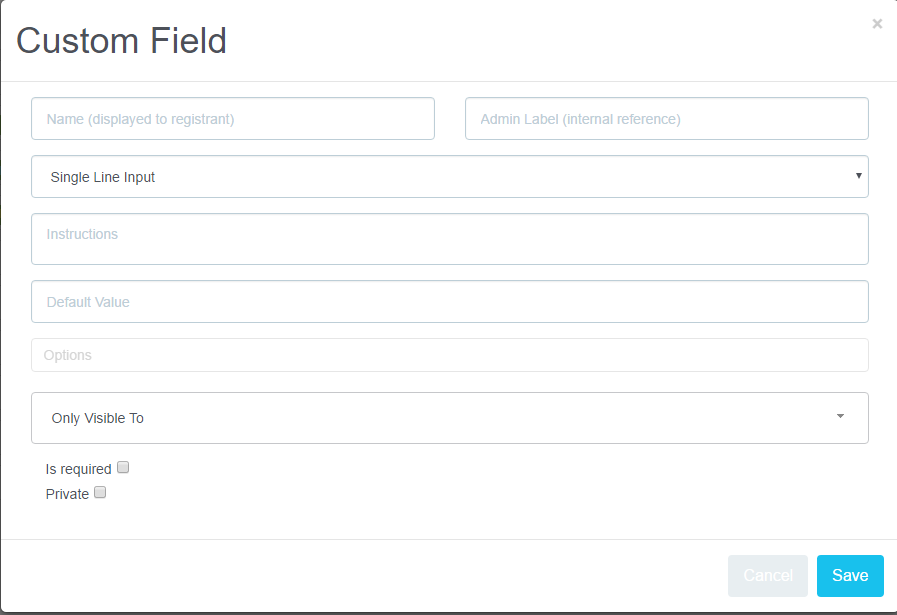
What do I put in each of these boxes?
Name (Displayed to Registrants): This is the name of the field the registrants will see when signing up on the site (eg. Shirt Size, Dietary Preference, Gender)
Admin Label (Internal Reference): This will show as a reference next to the name of your field and will only be visible on the admin side. It is used to organize your field archive. Some clients enter the name of the event they first created it for or they use the year it was first created, etc.
i.e. Name: Shirt Size
i.e. Admin Label: 2016
Type of Field: If you click on the single line input drop down menu, it will give you a choice of field types:
- Single Line Input: This field will show as a regular text box. Registrants can enter a short answer.
- Multi Line Input: This field is a larger text box and will allow registrants to enter a small paragraph.
- Single Option List: This field will be a drop down menu (eg Small, Medium, Large)
- Multi Select List: This is a multi choice field. Registrant will be able to select more than one answer.
- Date: This is a calendar format field to select a date.
- Number: This field will only accept numbers, nothing else.
- Section Header: This is used to organize your profile page in different sections. It is recommended if you have a long list of questions.
- Document and Image upload: This will allow your registrants to upload an image or document depending on the field you choose. The file size needs to be under 1MB.
Instructions: This will show as a question mark next to the field. Registrants can click on it to have more information on this custom field.
Default Value: This is only used for Single Option and Multi Select List fields. If you wish to have an option pre-selected, enter it under default value. One example: Do you want to sign up for our Newsletter? (field name) - Yes (default value).
Options: This is where you enter the different answers to your question. If your question is T-shirt size, you will need to enter the different sizes as options. Type one answer at a time and click "Enter" or "Add" after each answer.
Only Visible To: This is an important step! Select if the field is for individual registrants, group leader or guests (people registered by group leader). If you do not select at least one option, nobody will see the field on the front end.
Is Required: If checked, all registrants will have to fill out the field.
Private: If checked, the field will be hidden from the registrants and only visible for admin. Private fields can be used to track information on registrants. The private fields will be available for reports.
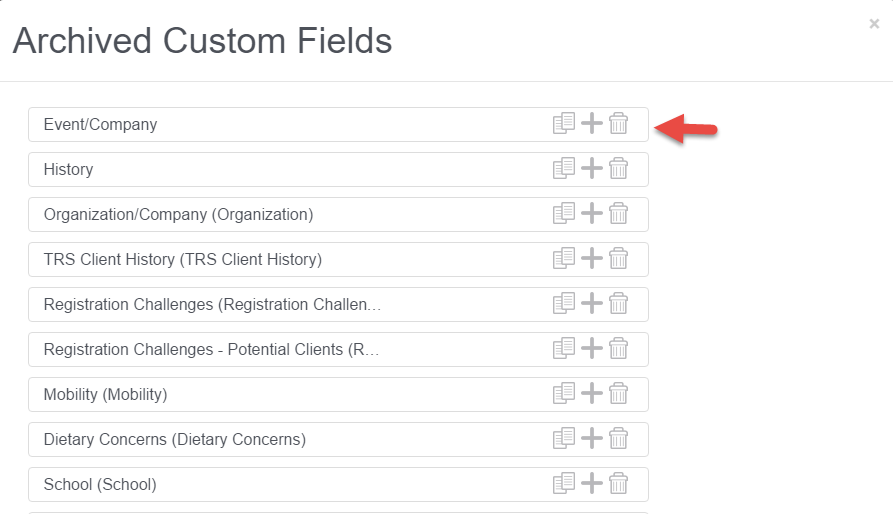
2. Add from Archive
When you click "Add from Archive" (right side of screen), you will access your custom field library.
If the field you need is already listed, you have 2 options to add it to your site:
- Clone the field by clicking the "Pages" icon: Cloning is used if you need to use the same field (name and options) as the one created but you do not want to pre-populate the information from previous registration. When returning registrants get to the new profile page, the field will be blank.
Recommendation: If you use this feature, we recommend adding the year or site name in the "Admin Label" box for tracking purposes.
- Add to list by clicking the "+" sign: This will add the same field previously used on other sites to your new site. You cannot modify this field, you have to use it "as is." When returning registrants get to the new profile page, the registrant's information will be pre-populated from previous registration and will be saved to the new site when they confirm their registration.
Important Notes: When you use the "Add To" list feature, the only thing the "+" does is display the previously answered questions to save time for the registrants when they fill out their profile page.
Registrants can change the answer to the field. In that case, the answers on site A and site B will be different. The fields do not sync across all of your sites.
Comments
0 comments
Please sign in to leave a comment.